
How to use the Conditions Engine
The Conditions Engine lets you make a bundle react to what your shopper is doing — hide or show products, jump between steps, apply a discount, or lock the add-to-cart button — all without writing any code. You build rules in a simple "when this happens, then do that" format directly on the bundle's edit page.
Before you start
- Create the bundle first, with its steps and products already set up. You'll pick from those steps and products while building rules.
- Decide on the behavior you want before you open the editor — for example, "hide the engraving step unless a ring is selected," or "apply a 10% discount once the bundle reaches $150." It's easier to build a rule when you already know the When and the Then.
Step 1: Open the Conditions Engine
- From your Shopify admin, open the Kitenzo app and go to your bundle.
- On the bundle's edit page, select the Conditions Engine tab.
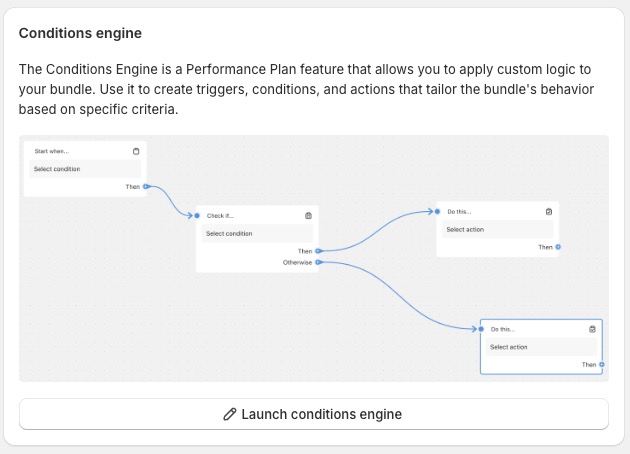
Step 2: Add a trigger (the "When")
- Select Add trigger to start a new rule.
- Choose what the trigger looks at: Bundle, Step, or Product.
- Pick the specific condition from that category (see the full list in Available triggers below).
- Set the comparison and value — for example, "Price is greater than $150," or "Contains the product(s): [pick a product]."
Step 3: Add an action (the "Then")
- On the trigger card, select Add action.
- Choose what should happen when the trigger fires (see Available actions below).
- Fill in the action's details — which product or step it applies to, how much of a discount, and so on.
- Optional: select Add action again on the same trigger to chain a second action to it — for example, hiding a product and disabling the add-to-cart button from the same trigger.
Step 4: Save and test
- Select Save.
- Preview the bundle on your storefront and walk through the scenario the rule is meant to catch, to confirm it behaves the way you expect.
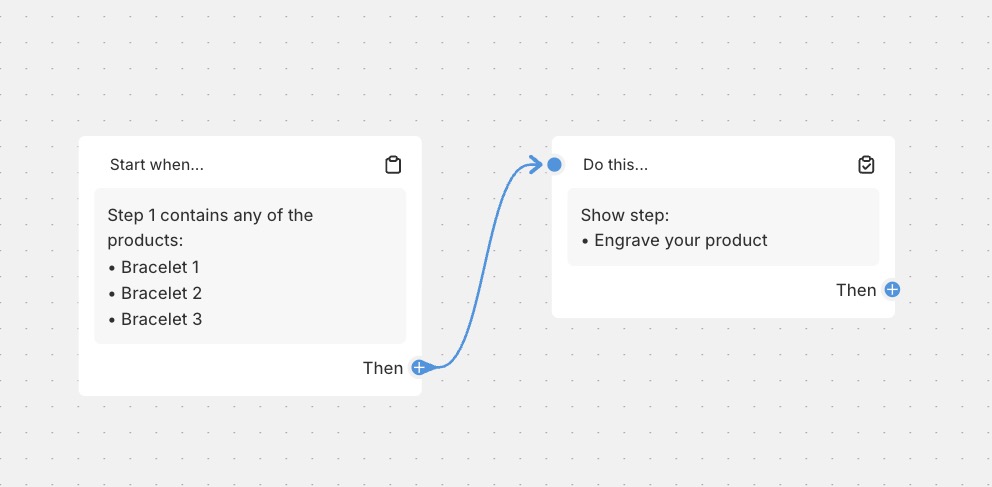
Available triggers ("When")
Bundle-level
- Price — compares the bundle's total price against a value.
- Product Total — compares how many products are in the bundle.
- Contains the product(s) — true when specific products are (or aren't) in the bundle.
- A variant is selected — fires whenever the shopper picks any variant anywhere in the bundle.
- Has a selected product with metafield — true when any product the shopper has picked, anywhere in the bundle, has a given product metafield matching a value.
- Has a selected product with variant option — true when any product the shopper has picked, anywhere in the bundle, has a given variant option matching a value.
- Contains amount of product(s) — compares the quantity of specific products.
Step-level
- Price — compares the bundle's total price against a value.
- Product Total — compares how many products are in the bundle.
- Contains Product(s) — true when specific products are (or aren't) in the bundle.
- The selection has metafield — true when any product the shopper has picked, anywhere in the bundle, has a given product metafield matching a value.
- The selection has variant option — true when any product the shopper has picked, anywhere in the bundle, has a given variant option matching a value.
- Contains Product(s) Amount — compares the quantity of specific products.
Product-level
- Stock — whether a product is in stock or out of stock.
Available actions ("Then")
- Go to step — jumps the shopper to a different step.
- Show or hide step(s)
- Show or hide product(s)
- Enable or disable the add to cart button
- Apply discount — a percentage (up to 100%) or a flat amount off the bundle.
- Match variant selections across products — automatically applies the shopper's chosen variant option (e.g. Color) to every other product in the bundle that shares it. Only available when a "A variant is selected" trigger is used.
- Free products (buy X, cheapest Y free) — automatically discounts the cheapest item(s) once enough qualifying products are added.
Build a rule that describes products instead of naming them
Most rules point at specific products. But you can also write a rule that reads a product metafield or a variant option off whatever the shopper has selected, so it keeps working automatically as you add new products — without ever needing to be edited again.
Here's the full walkthrough for a common case: making sure a pendant only shows up for chains it actually fits.
Step 1: Create the metafield definitions in Shopify
- From your Shopify admin, go to Settings > Custom data, then select Products.
- In the Metafields section, click Add definition.
- Under Name, enter
Chain width. - Under Namespace and key, edit the auto-generated identifier so it reads
customas the namespace andchain_widthas the key (together,custom.chain_width). - Click Select type and choose Single line text.
- Optional: click Add description and note that valid values are
wideornarrow. - Save the definition.
- Repeat the same steps for a second definition: name it
Fits wide chain, set its namespace and key tocustom.fits_wide, and set its type to True or false.
Step 2: Tag your products
- Open a chain product's page in Shopify admin.
- Find the Metafields section (click View all if it isn't already visible).
- Set Chain width to
wideornarrow, then click Save. - Repeat for each chain.
- Open each pendant product's page and set Fits wide chain to true or false in the same way.
Step 3: Build the rule in the Conditions Engine
- Open the bundle's Conditions Engine page and select Add trigger.
- Choose Step, then pick your Chain step.
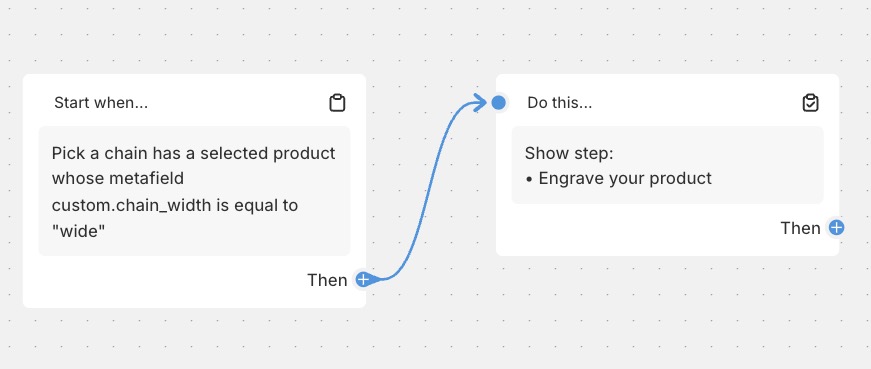
- Select the condition The selection has metafield, choose the field
custom.chain_width, set the operator to Is, and enterwideas the value. - On that trigger card, select Add action and choose Show or hide product(s).
- Set it to Hide, then switch the target from a fixed product list to Products matching a rule.
- Choose Metafield, select
custom.fits_wide, set the operator to Is not, entertrueas the value, and scope the action to your Pendant step. - Select Save.
That's the whole rule — no product names anywhere. Picking a wide chain hides every pendant that isn't marked as fitting a wide chain; picking a narrow chain shows them all again. Tag a new pendant correctly later, and it slots into the rule automatically.
A few things to know about these rules
- A condition is true if any matching product the shopper picked satisfies it — not all of them.
- A product with the metafield left blank is treated as not matching. So a rule reading "is not true" will hide a product whose metafield was never set — this is intentional, so an unconfirmed product defaults to being hidden rather than shown.
- If both sides of the comparison are numbers, "greater than" and "less than" work as expected. If either side isn't a number, only "is"/"is not" do anything.
- Matching ignores capitalization and accents, so it keeps working on translated storefronts.
- The same kind of rule works with a variant option (like "Chain width" as a Shopify option, not a metafield) instead — just choose the selection has variant option instead, and match against the option's exact name as it appears in Shopify.
Surcharges on fixed product bundles
If your bundle has a fixed price but not every product in it is worth the same, you can charge extra for the pricier ones without changing the set's price. Picking a premium item adds a fixed amount on top of the bundle price instead.
Step 1: Turn on the feature and name your metafield
- From your Shopify admin, open the Kitenzo app and go to Settings > General.
- Find the Product surcharges section.
- Under Namespace and Key, enter the namespace and key of the variant metafield that will hold each surcharge amount (for example, namespace "custom", key "set_surcharge").
- Leave either field empty to turn surcharges off for the whole store.
Step 2: Set the surcharge amount on your variants
- Create a metafield definition matching that namespace and key, applied to Variants (not Products) in Shopify, with a numeric type.
- On each variant that should cost extra, enter its surcharge amount — for example, $20 on a premium pendant, $90 on an upgraded chain.
- Leave the metafield blank on any variant that shouldn't add anything — it will be treated as fully included in the bundle price, with no surcharge.
Step 3: Turn it on for the bundle
- Open the bundle you want surcharges to apply to.
- Go to its Pricing card.
- Enable "Add product surcharges."
- Once it's on, product cards in that bundle show what each item adds to the price instead of the product's own price, and the shopper's total updates as they pick premium items.
Key considerations
- This is built for fixed-price bundles — a bundle with one set price where some products are worth more than others.
- Surcharges are stored per variant, not per product — so two variants of the same product (like different chain lengths) can carry different surcharge amounts.
- A variant with no surcharge amount stored costs nothing extra — it's included in the bundle price as normal. Nothing needs to be filled in for standard products.
- The surcharge is added after any discount, so it's never itself discounted away — and it doesn't count toward tiered-discount thresholds or a bundle's minimum spend, which are still based on the products' own prices.
- Changing the namespace or key in Settings re-syncs your whole catalogue so the new values are picked up — on a large catalogue that can take a few minutes.
- The setting must be turned on in two places: the metafield needs naming once in Settings > General for the whole store, and then "Add product surcharges" needs enabling separately on each bundle that should use it.